
How to Convert iTunes to MP3 in 2025 [Includes Free/Paid Tools]
Summary: To help you out, we have tried and tested some free options and robust paid solutions. Learn how to download MP3 from iTunes to deal with DRM-free tracks and protected Apple Music files.
Table of Contents
Music downloaded from iTunes is typically in M4A or unprotected M4P formats, which lack compatibility across devices and apps. This can frustrate users needing the freedom to play their music without limitations.
Here are a few common scenarios where you may seek to convert iTunes files to MP3:
- Rip the CDs in the iTunes app
- Conversion of high-quality files to other (compressed) formats and managing space
- Convert and listen to iTunes to MP3 player
- Store songs on USB flash drives for a convenient music-listening experience
- Creation of an MP3 CD with an audio file inside the playlist
How to Convert iTunes to MP3: Recommended Methods
Learning how to convert iTunes to MP3 is essential. We used iTunes MP3 Encoder and Audacity to offer free conversion solutions for unprotected songs. For superior audio quality, we turned to a pro-level option: MusicFab Apple Music Converter. Here's a look at how each tool performed during our trials.
How to Convert iTunes Songs to MP3 Using iTunes
Step-by-Step Guide on How to Convert iTunes Music to MP3
Step 1: Open iTunes on your Mac computer. Go to the File menu and click Add File to Library (or Add Folder to Library) to add local music.
Note: If you already have music in your library, there’s no need to buy anything new. But if you’d like to, iTunes lets you purchase songs directly from the iTunes Store.
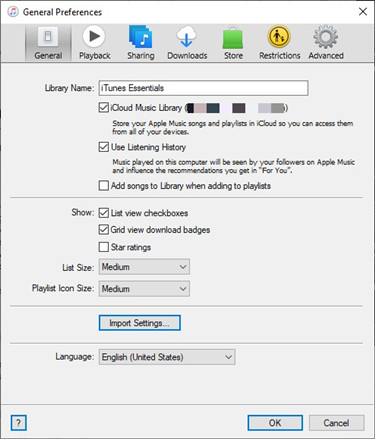
Step 2: Open Preferences from the top menu. Then, under the General tab, click Import Settings...
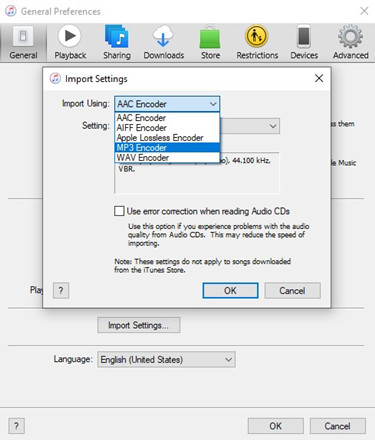
Step 3: Afterwards, change the Import Using setting to MP3 Encoder via the dropdown menu.
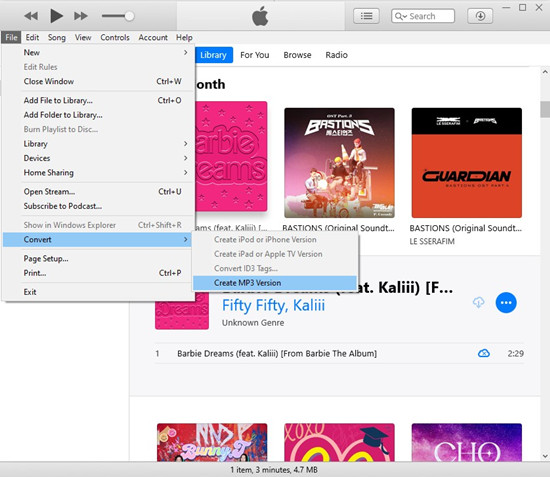
Step 4: From the library, select all the songs you want to convert. Then, click File in the top menu and select Convert > Create MP3 Version.
By following these steps, it took only a few extra seconds, but our new MP3 song versions appeared next to the originals. The new song tracks were available to play and transfer to any device.
Challenges
- It fails to work on Apple Music tracks that have DRM restrictions
- Limited output formats without customizable quality options
- The MP3 version appears alongside the original, which can clutter the library if you're converting many files
Our Experience
Using iTunes' built-in converter was quick and straightforward. The process of converting iTunes to MP3 went smoothly. We didn't require any additional software to complete the task. The conversion speed was fast. However, there was a slight degradation in the music's sound quality, particularly with standard CD-ripped files.
However, despite being free, this method has some downsides. We were unable to convert DRM-protected Apple Music files. Similarly, it also didn't work with older protected iTunes purchases. Besides MP3, we could only see basic encoding formats, with no FLAC or advanced quality controls. New users may find its interface complex. Initially, it took us quite a while to find the MP3 Encoder option. Overall, it is a decent method for obtaining basic MP3 files from unprotected tracks.
How to Convert iTunes Music to MP3 Using Freeware Tool
Step-by-Step Process on How to Download iTunes Songs as MP3
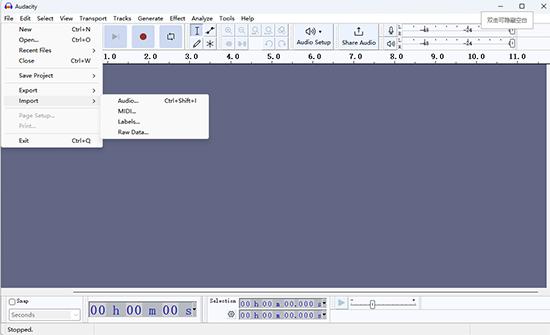
Step 1: Open Audacity on your Windows PC (though it has cross-platform availability) and import your iTunes music track. Then, click the File menu and select Import to upload your required audio files for conversion.
We also tried dragging and dropping the files directly into Audacity — that worked just as well.
Step 2: As soon as the songs are loaded, go to File and select Export. Then, choose either Export Selected Audio to export individual tracks.
Note: Audacity features an 'Export Audio' function that allows you to save the whole project in one go.
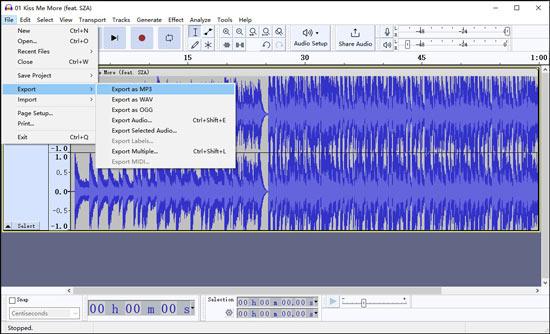
Step 3: Then select MP3 as the output format in the export window that popped up.
Step 4: After confirming the export settings, hit the Export button. Audacity will convert iTunes files to MP3 and save them on your computer.
Challenges
- It does not work on DRM-protected Apple Music tracks
- Lacks automation; entirely manual, so batch conversions take more time
- There is a steep learning curve, especially if you are unfamiliar with audio tools
Our Experience
Working with Audacity required a bit more manual work than other professional tools. But as a free solution, we had decent results in the end.
The interface felt somewhat technical. And fine-tune the output by customizing the bitrate and updating the metadata, which was a nice touch. However, it didn't work on DRM-protected music files. Also, converting single songs was easy and quick. However, the manual load made it complex to convert bulk songs simultaneously.
How to Convert iTunes Songs to MP3 Using MusicFab Apple Music Converter
TrustPilot Ratings: 4.5/5
Best For: Converting and preserving bulk Apple Music files in lossless quality
While the free methods worked fine to convert iTunes to MP3, they still lacked professional grace and quality. MusicFab Apple Music Converter emerged as a stunning solution to convert and play Apple Music without a device or DRM restriction. Its built-in Apple Music web browser and player offered a more convenient way to search and preview music directly without putting a strain on system resources.
Key Attractions
- Download Apple Music tracks at 20x faster speed
- Search and convert Apple Music with a built-in browser
- Offers many output options for high-quality audio, such as MP3, FLAC, WAV, and others
- Preserves ID3 tags and saves lyrics (external .Irc files)
- Bulk download songs, playlists, albums, podcasts, and audiobooks
Step-by-Step Process on How to Convert iTunes Songs to MP3
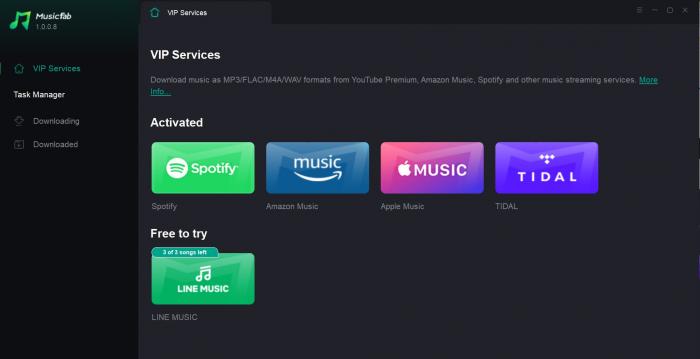
Step 1: First, download and install the MusicFab software from the official website. Then, access the program's main interface and select Apple Music from the right panel.
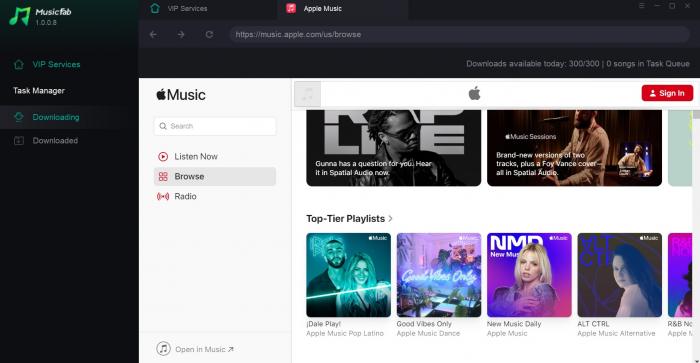
Step 2: After logging into the iTunes account, navigate the built-in browser. After that, find the desired track, and MusicFab will promptly analyze and recognize the song’s information.
Step 3: After careful analysis, a panel will display on the screen. Tailor the export settings and select MP3 as the output format. Also, adjust the audio quality to match your preferences.
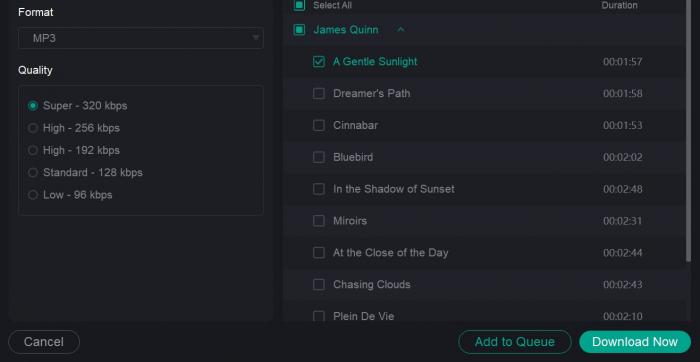
Step 4: Finally, click the Download Now tab, and the conversion process will begin immediately.
Free Trial: MusicFab gives you full-feature access during the free trial— convert 3 tracks to test it out.
Our Experience
Using MusicFab was smooth and surprisingly efficient. The main interface was pretty clean and user-friendly. We could easily locate the Apple Music app in its built-in browser.
MusicFab could quickly analyze the imported track and offered us the flexibility to select an output format. In addition, its impressive speed converted each song in just a short while. The process ran smoothly in the background. Overall, MusicFab's fast performance can please new and professional users equally. It was especially helpful that it handled DRM-protected Apple Music tracks without any extra hassle.
Our Recommended iTunes-to-MP3 Conversion Methods - Comparison Table
Let's look at the detailed comparison of all three methods discussed to convert or export iTunes to MP3. Our well-thought-out table will help you better understand the methods and make an informed decision.
| Key Parameters | iTunes MP3 Encoder | Audacity | MusicFab Apple Music Converter | |
|---|---|---|---|---|
| Best For (Purpose) | Simple, DRM-free iTunes library files | Advanced users needing flexibility or editing | Anyone needing to convert DRM-protected Apple Music songs | |
| Compatible OS | Windows and older macOS versions | Windows, macOS, and Linux | Windows and macOS | |
| Ease of Use | Easy (built into iTunes) | Medium (requires manual setup) | Very easy (automated interface) | |
| Supports DRM-Protected Songs | No (works only on unprotected files) | Yes (but requires real-time recording) | Yes (supports Apple Music and protected M4P files) | |
| Output Formats | MP3, WAV, AAC, and AIFF | MP3, WAV, OGG, etc. (many formats) | MP3, M4A, FLAC, and WAV formats | |
| Audio Quality Customization | Basic bitrate settings | Full control over bitrate, sample rate | Full quality options | |
| Conversion Speed | Fast | Slow | Super Fast (20x faster speed) | |
| Batch Conversion | Limited | No | Yes |
Bonus: Comparison Table - iTunes Unprotected M4A vs iTunes Protected M4P vs MP3
Here's a quick comparison of the iTunes unprotected M4A, protected MP4, and MP3 formats in terms of audio quality, compatibility, and several other aspects. This will help you learn more about your audio consumption formats (ways) to refine the listening experience.
| Key Parameters | iTunes Unprotected M4A | iTunes Protected M4P | MP3 |
|---|---|---|---|
| File Extension | .m4a | .m4p | .mp3 |
| Audio Codec | AAC | AAC | MP3 |
| Audio Quality | High (better than MP3 at the same bitrate) | High (same as M4A) | Good (lower than AAC at the same bitrate) |
| DRM Protection | No | Yes (Apple FairPlay DRM) | No |
| File Size Efficiency | High | High | Medium |
| Compatibility | High | Limited (Only with Apple devices/accounts) | Very High (Almost all devices & platforms) |
The Bottom Line
For most audio enthusiasts, iTunes is a boon, providing an enriching music and rhythmic experience. However, MP3's broad compatibility, compressed file size, and decent sound quality make it a go-to option for most music lovers. Here, we have provided you with the best tools and techniques to convert iTunes to MP3. We have even shared our experience to help you understand the tool's working more closely. Considering the challenges with the free methods, MusicFab is our preferred choice. Despite the process being automated, it gives more control over the output settings. Plus, its interface and GPU-accelerated speed were a bonus!
FAQs
Q.1. How to add MP3 file to iTunes on iPhone?
Adding MP3 files to iTunes and syncing them to an iPhone can be a complex process. Here's how to proceed.
Step 1: Open iTunes on your computer. Go to File > Add File to Library (or Add Folder to Library) and select the MP3 file you want to add.
Step 2: Next, grab a USB cable to connect your iPhone to the PC. Click on the phone's icon in iTunes.
Step 3: Click Music and check the Sync Music box.
Step 4: Select the MP3 files to sync and click Apply.
Q.2. How to convert WAV to MP3 iTunes on Windows PC?
To convert WAV to MP3 using iTunes, follow these steps.
Step 1: Launch iTunes on your Windows PC.
Step 2: Set the MP3 Import Settings by going to Edit > Preferences > General and choosing Import Settings.
Step 3: Select MP3 Encoder in the Import Using dropdown. Select a preferred quality setting.
Step 4: Find the WAV files for conversion in the iTunes library. Right-click the selected file and select Create MP3 Version.
Q.3. How to restore 'Add to Device' in iTunes to add MP3 on a Windows 10 PC?
Conditions may arise when you are unable to add MP3 songs to your iPhone due to the absence of the 'Add to device' option. To restore the option for seamless addition of your favorite MP3 tracks, log in to iTunes, then go to Edit > Preferences and uncheck the iCloud Music Library box. Then, restart iTunes and attach your iPhone. Get to the Music section > Songs listing. Right-click a song and choose 'Add to Device' to add your desired MP3 file.
 6 Working Free Apple Podcasts to MP3 Downloaders with Step Guide
We list out 6 best options for the best Apple podcast downloaders, one of which can be considered to be the most powerful tool ever.
 How to Download Music From Apple Music to Computer: Guide With Steps
While enjoying your favorite songs on Apple Music, if you want to save them permanently on your system or other devices for your dependency-free offline listening, you should know how to download music from Apple Music to computer using different ways.
 2025 Top 9 Online Tools to Convert Apple Music to MP3
If you want to enjoy the entire Apple Music library or your favorite Apple Music tracks offline, you must be curious whether Apple Music converts to MP3. Unfortunately, Apple Music doesn't support content conversion to MP3. However, you can try the top 12 trending tools to learn how to convert Apple Music to MP3 on different devices and platforms. Pick the right tool and enjoy the Apple Music audio tracks free forever, anytime, anywhere.